First change your grid to circular and set the number of radials (lines coming out from the middle) to a high number which is divisible by four. I've used 16 but 32 or 48 would be better but it wouldn't show up well in a photo.
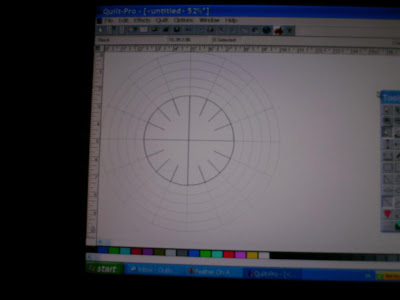
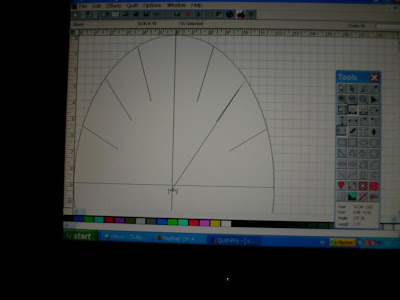
Then using the circle shape tool draw a circle any size. Then using the line tool draw a line vertically and horizontally going through the centre of the circle. then draw shorter lines going from each outside radial towards the centre but not all the way.
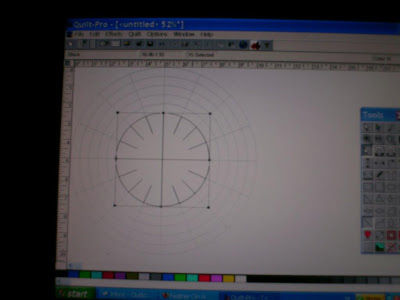
Change your grid settings back to solid. Go to the edit menu and 'select all' and move the whole drawing to the top left hand corner as far as it will go.
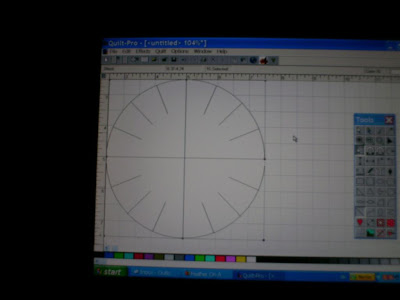
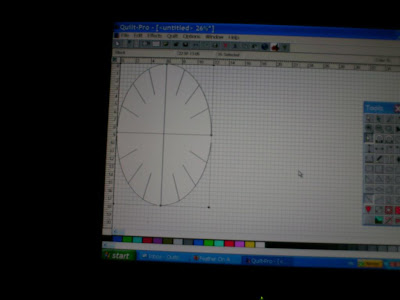
Reduce your screen so you can see the measurement for the width you want your oval to be. The using the toggle half way down on the right stretch it all over to that width. You can see how far you have gone by looking at the measurement at the top of the screen. At this point you might want to reduce the screen some more so you can fit in the height of your oval. Then stretch the shape down as far as you want.
Print this off to 'fit to page' . Using the tape measure tool measure the distance from each mark on the outside to the centre and write it on your printout.
Then all you have to do is trace out your printout onto a large enough piece of paper (or place it directly under your fabric) and extend all the lines out as far as you need. Then mark on each line the right distance. Join up the marks and voila! you can have a perfect oval in any size you could wish for.
 Then using the circle shape tool draw a circle any size. Then using the line tool draw a line vertically and horizontally going through the centre of the circle. then draw shorter lines going from each outside radial towards the centre but not all the way.
 Change your grid settings back to solid. Go to the edit menu and 'select all' and move the whole drawing to the top left hand corner as far as it will go.
 Reduce your screen so you can see the measurement for the width you want your oval to be. The using the toggle half way down on the right stretch it all over to that width. You can see how far you have gone by looking at the measurement at the top of the screen. At this point you might want to reduce the screen some more so you can fit in the height of your oval. Then stretch the shape down as far as you want.
 Print this off to 'fit to page' . Using the tape measure tool measure the distance from each mark on the outside to the centre and write it on your printout.
 Then all you have to do is trace out your printout onto a large enough piece of paper (or place it directly under your fabric) and extend all the lines out as far as you need. Then mark on each line the right distance. Join up the marks and voila! you can have a perfect oval in any size you could wish for.
I might have to have a look at Quilt Pro, it has potential to do more of that I want that EQ which is what I have been using. Thanks for posting enough infor for me to be able to see that.
ReplyDelete